Showing posts with label multitouch. Show all posts

Plans for the Desk

EDIT AGAIN: Scratch the whole array idea entirely. I just found a method at NUI group that uses photoresistors (i.e. fast scanning), but only requires them along the edge. Even though they are on the edge there are no occlusion problems as one might expect because of some magic with polarizing film. Will post updates soon.

EDIT: Well it seems that the rise time on photoresistors is generally about 60 ms. This is a hit on the response time of the screen. Basically what that means is no matter how fast we sample the matrix, true response is limited to about 16 fps. So the goal is to either find a photoresistor which is cheap and has a rise time of ~10ms -> 100fps, or else think of a new sensing system.

First of all, we (or maybe just I) plan on finishing the first desk by the end of Christmas break, but I have some ideas for the next version of the desk that I'll talk about now. The major improvement I want to make is to the size. The first version of the desk is about a foot and a half deep because of the distance requirement of the camera from the screen. So the first step in making a thin desk is eliminating the camera from the design.

Obviously, we need some sort of visual sensor to replace the camera, so the option we will try is to make a large array of analog light sensors (photocell network) underneath the screen. A micro-controller will then read the value of each sensor sequentially and use an algorithm to deduce the location of blobs. The circuit underneath the screen will look something like this. To select a column, the MCU puts a voltage on one of the top pins, and a high impedance on the others. Then, to read a specific sensor, the MCU puts one of the row outputs through an analog-to-digital converter (using a multiplexer in between).


So far it seems that diodes are required on every photocell in order to prevent current from flowing through the other resistors. I simulated the circuit and it seems that the back-flow was somewhat negligible, especially in larger matrixes, but diodes are cheap, and precision is good, so I will keep them.

The other concern is the cost and difficulty of construction. For the first version of the desk I want to use a 32x24 matrix of photocells, so there are 768 cells that need to be purchased and soldered. So far the cheapest I have been able to find are $0.32 for large volume orders. I would be very glad to find one closer to $0.20, bringing the cost for all resistors down to $150. The diodes and resistors needed don't total to be more than $10-$15, so they aren't a problem. I was thinking I might be able to use my lab's rapid prototyping machine to fabricate the PCB and solder all of the components onto it.

The Behemoth

So we made a quite of a bit of progress this morning. We remade the base of the screen out of one big piece of wood and then attached all of the LED's to it.


Modified Endlighten Backlight Design

I think it might be worth modifying the design in the previous method using two sheets of Endlighten instead of one. The layer on top is the sheet of Endlighten filled with IR which serves as the multitouch vessel and the protection for the LCD. A sheet of acrylic on top was already a requisite for this design anyways. The sheet of Endlighten below is only filled with white light to serve as a backlight.

This solves the problem of accidental reflected infrared in the previous design. Infrared from rear-LCD layer will be reflected off the mirrored back surface of the LCD washing out the image to the sensor array (or the camera if we are still using one) which requires more image manipulation on the software side to get good blobs. Keeping the IR above that reflective surface could prevent this.

Thickness Solution

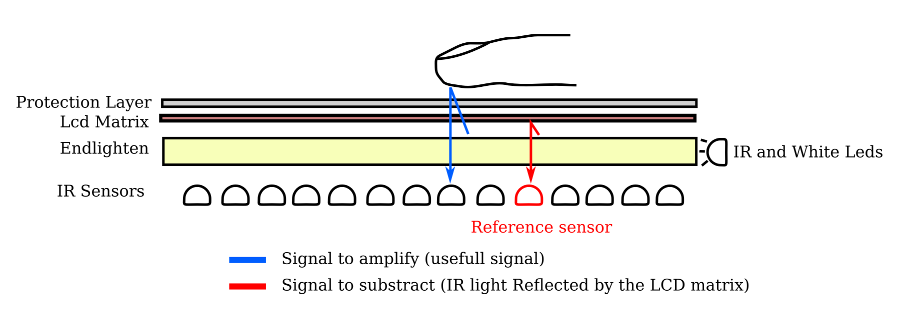
After we discovered Endlighten just today we started looking into potential solutions that use the technology. Jason discovered a project being undertaken by Mark Moissette at kaosat.net. From his research, it appears that it is possible to use a single sheet of Endlighten as both a backlight for an LCD and an infrared plane for touch sensing. The application of this is the ability to place the LCD and a thin protective layer directly over a single sheet of endlighten resulting in a fully functional display (sans imaging) without the hassle of using the original LCD backlight.

Furthermore, we have finally found the solution to removing the space-expensive camera from the design. We were previously looking into sensor array solutions that would fit between the backlight and the lcd. This wasn't possible without major engineering because this sensor array would have had to been almost completely transparent. However with this new design by Mark Moissette the sensor-array can be placed under the backlight. The following diagram was taken directly from his blog:
We finally have found a method for creating super thin displays using the same original multitouch principles but replacing the large projectors and cameras with lcds and sensor arrays. Too bad we can't say the idea was our own, but it's still good news. This new method requires a few parts that we don't have however, so the current project will still use the original camera-based method. Future projects will almost certainly use this new method.

Thickness Problem

Today, I spent a good deal of time trying to think about ways to make our touchscreen a lot thinner. So after being bugged by Keegan to start posting, here is my stream of conscience recap of what I looked at:

To start, one of the biggest problems with space is that the camera needs to be so far away to completely see all of the touch-able surface. As it stands right now, our screen is a 19" diagonal LCD which equals a width of about 17". So using some basic math we have:


So we need our camera to be about a foot away from the LCD plus the ~3" for the size of the camera and the length of material to attach it to our container.

My first thought was to look into cameras. I wiki'ed a bunch about how the CCD and CMOS parts of digital cameras work. So this lead me to wonder if they made large-scale but low resolution CCD plates that we could stick directly under LCD. No luck there however. The biggest sensor I could find for sale was a little over an inch wide and was very expensive ( $_$ ).

Next, I started looking into whether or not we could find/make a capacitive sheet that reacted to infrared light. So this lead to a bunch of wiki'ing and I found a good page about transparent films that are being used today. I then contacted a place that makes conductive coatings but I have yet to receive a response.

My next thought was looking into whether or not there was some extreme wide angle lenses that we could attach to the camera so that we could move the camera much closer and save space. However, all I could find was a bunch of thousand dollar lenses that attached to thousand dollar cameras. Similarly, I looked into whether or not there is some kind of special shaped and made glass that could bend light into a very small area, sort of like how mirrors for stores are used so that storekeepers can see shoplifters up and down a long isle or how security cameras have warped lenses to see a whole area. No luck.

So then I stated to consider if it would be easier to find a non-transparent film (because maybe that is a more reasonable request?) and then find a special kind of diffuser that would allow IR light to pass through. Or if we could get a diffuser that allowed IR light to pass, we could close up the diffuser, LCD, and acrylic in a separate container and then conceal cameras elsewhere in the design.

And now I am brain dead...

Update - 8/4/10 4:04 PM

Keegan has found some acrylic called Endlighten (c) that apparently works as both a IR diffuser and backlight. Check it out!

Project Berlin

The project we're working on now is a prototype high-tech school desk. The idea was proposed by Kendal Smith, a Chemistry teacher at our high school. The general concept is this: a desk in which the surface is a touch screen computer (à la Microsoft Surface) and the computer runs education-oriented software (distribution of learning materials, test taking, digital homework, etc.)

To accomplish the multitouch aspect we're using a method called FTIR Touch Sensing developed at NYU. In this method, a sheet of plexiglass is flooded with IR light. When your fingers make contact with the sheet the IR light is scattered and shined into an IR-sensing camera below. The image is used by the computer to determine the location of the touches.

Most DIY systems use a rear projector and a layer of silicone-coated drafting vellum above the plexiglass to project the image onto. The silicone also creates good contact between your finger and the surface. We are instead using a simple LCD to cut costs. This presents a few problems which we haven't yet solved, most notably a method for backlighting the display, and a material besides vellum to help with finger contact.

To accomplish the software aspect we will first be using Touchlib and Windows 7. The long-term goal is to use our own operating system known as Oceania which is a glorified Newspeak Programming Language virtual machine that will run education software and have built in support for multitouch. I'll let Ryan write the first post on the Oceania project.

You can see the progress we've made so far in the previous post on blobs. As we make more progress we'll keep you posted. Jason, Ryan, and I are working on this project.

First Blobs

Here are the first couple screenshots from the PS3 Eye camera. These are images related to project "Berlin" which consists of the creation of a desk who's surface is a multitouch display. The end result is hopefully something education-related as the idea was conceived by my high school Chemistry teacher Kendal Smith. More on the project in later posts.

The following first images are blurry because they were taken by our first camera. It was damaged because I tried to dig out what I thought was an IR filter but which was actually part of the lens.


This last image is from the newer camera that is still in tact. You can clearly see led strips surrounding the display and the blobs of infrared light where Keegan's fingers touch the screen.